
I am so excited to be sharing with you a step-by-step process on how to create beautiful and simple wood panels for your walls, here our process in our Living Room makeover. In a nutshell: It is way simpler than it looks.
I made a youtube video to explain all of it if you are more the video type person. Link at the bottom of the page.

If you are looking to achieve a similar look in your home, check my Wall Paneling Design/Drawing Online Service for a bespoke plan made for your walls/room dimensions.
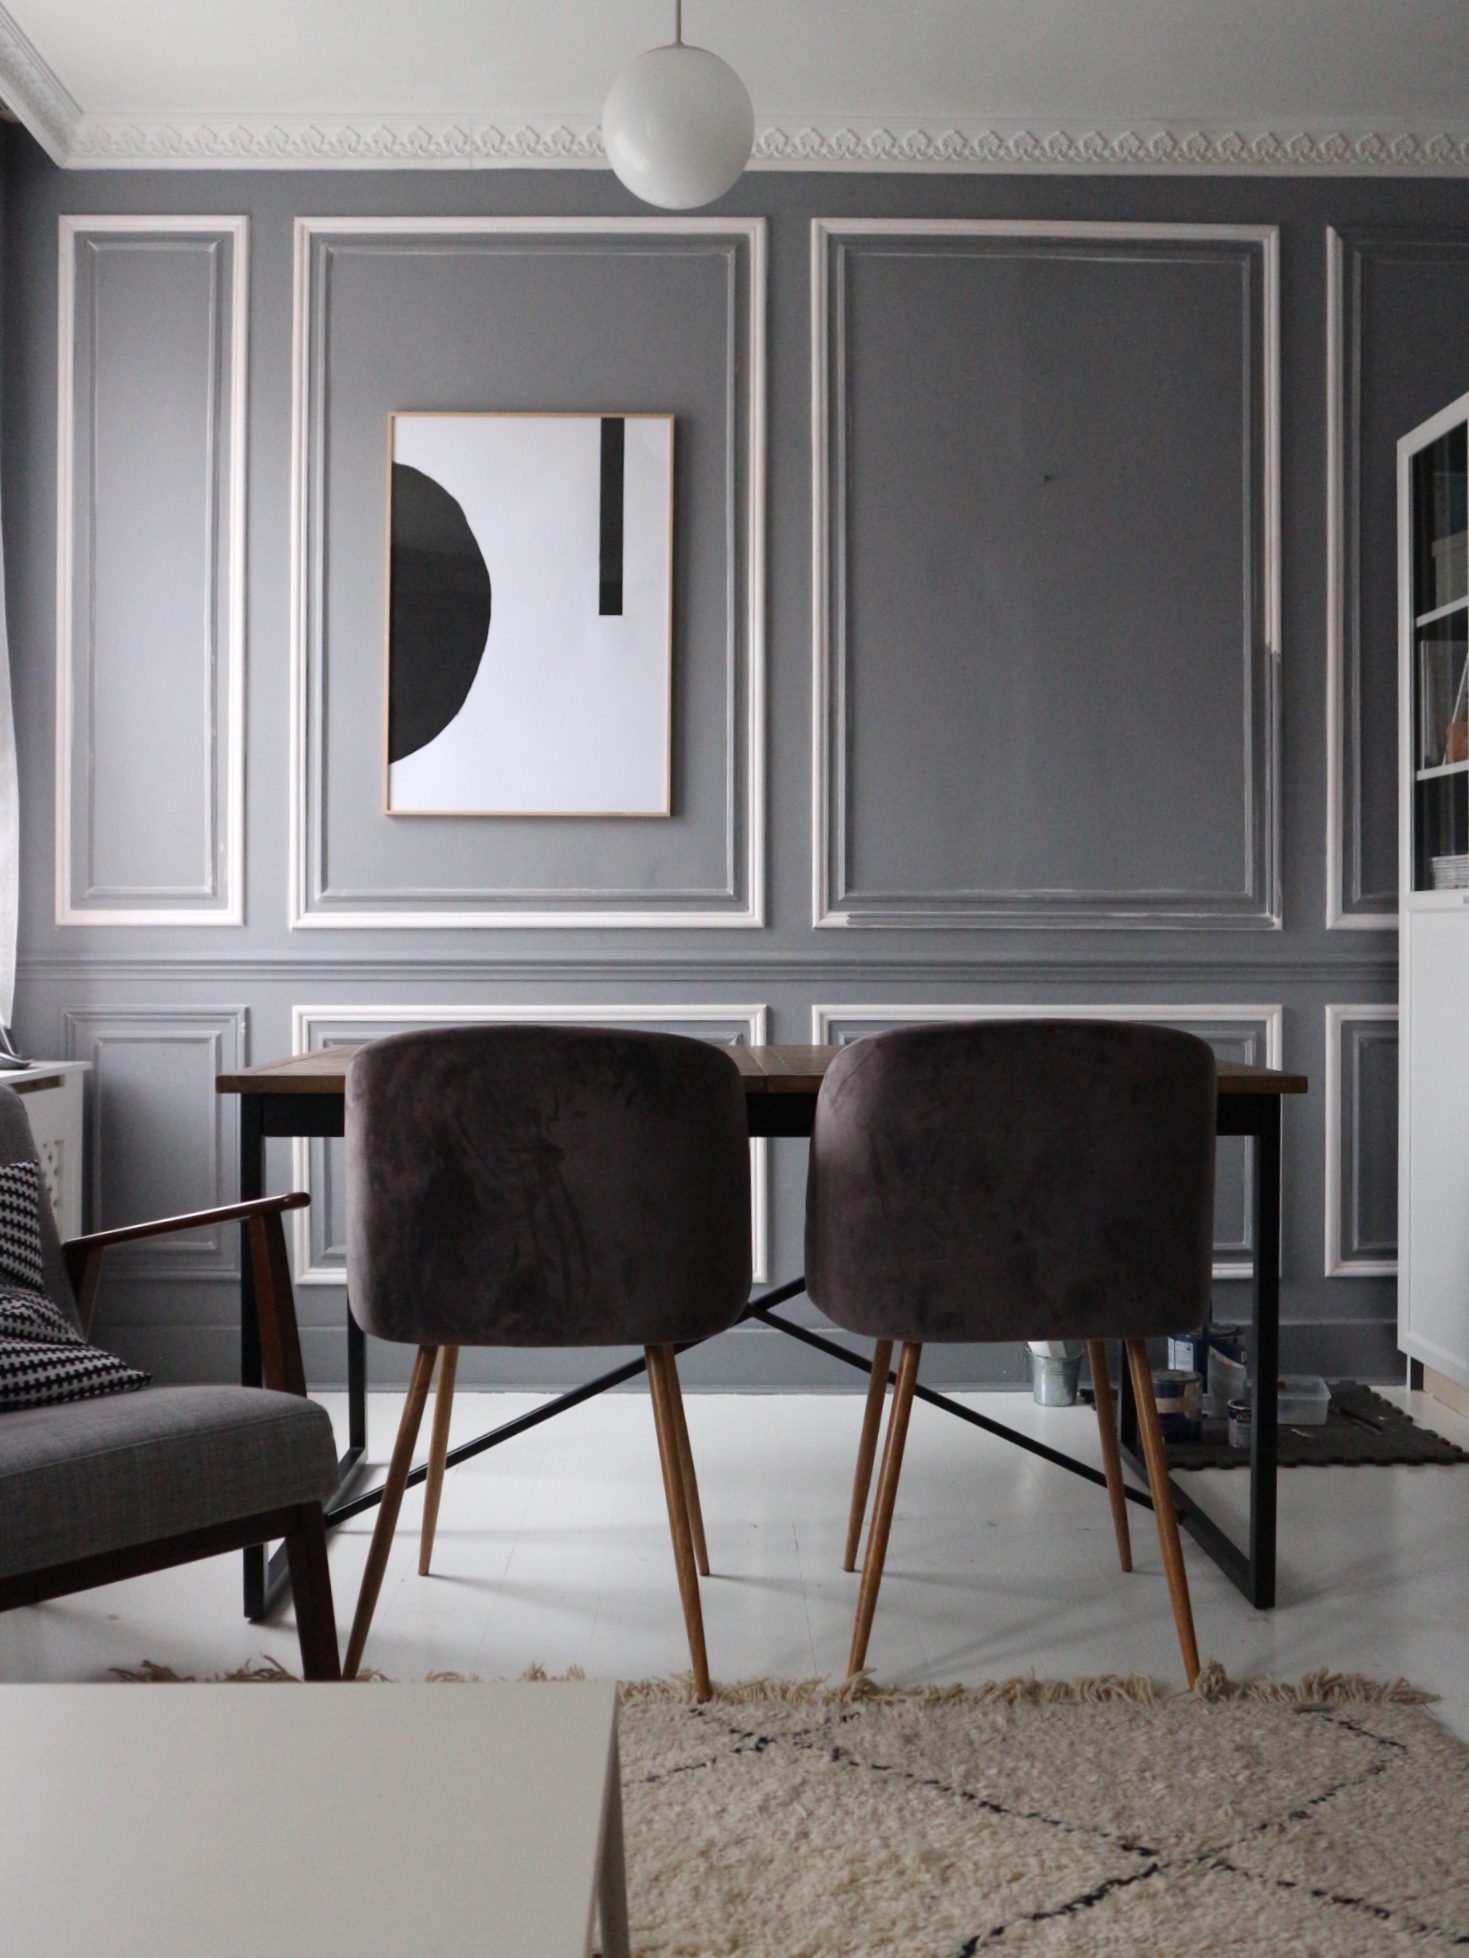
I have been wanting to add panels to our living room since the day I first visited the house. At the time, the living room was stripped down from any period feature (and boasting a nice white magnolia colour *erk*) and we gradually have added a few periods features back. The dado rail, to start with, typical from the Edwardian era, then a simple coving (with a hack on the curtains! Check out my Instagram if you are curious) and now the long-awaited wood panelling yay. (I am so excited, what I said it already?)
I was inspired by old english period features and french haussmann parisian flats but you can find similar feature in many european period buildings. The options are limitless. A quick look in interior books, pinterest or instagram will convince you of that.

This type of DIY is going to transform the look of your living room. A single wall (here ours is 3.3 meters wide) is totally manageable in one weekend (for simple frames, think double of the time if like us, you want double frames), but do have a plan already made otherwise it will take more. On the total time, we spent on this DIY. 60% has been planning and 40% is the execution.


My Design Thought Process
It took me some time to identify the type of wood frame/architrave (thickness, material) and general layout I wanted for the wall.
Our starting point was that I wanted to display two large A1 frames in the middle of the wall, therefore I needed to design two large wood panelings that could “contain” them and keep a nice symmetry either side. From there, the rest of the design flowed, I naturally added two smaller frames on either side of the large panels.
Enjoying this blog post? Why not sign up for email notification or follow me on Instagram? I am always doing some home project that could spark inspiration for yours too! Links on the banner and bottom of the page.
Using my computer and paper to come up with a design draft
I first started using paper to draw a high-level sketch. ( I am completely self-taught by the way so be nice.)
Then I moved onto the computer. Here below is a 3D drawing I created as part of the creative process. It is a bit rough, I wasn’t interested in seeing a perfect picture. I wanted to have a visual of how a 3cm thickness outer and 2cm thickness inner panel would look like compared to our existing 6cm dado rail and include a few 3D objects, like our dining table.. It is all about the proportion with wood frames! It has been helpful to visualise the proportion in that way and to define the space between the panels, from the coving and from the dado rail. This definitely helped in picking out the right architrave for the job as well. (check out my 3D design service page here)
Check out my Pinterest board of “wood panelling” if you want to see real project pictures. Me and my partner have messaged each other and commented on countless pictures with wood frames to come up with ours, I know #interiorgeeks much. However, that’s not for everyone and I am hoping our story could help others who are considering wood panelling as a wall decoration for their period living room.
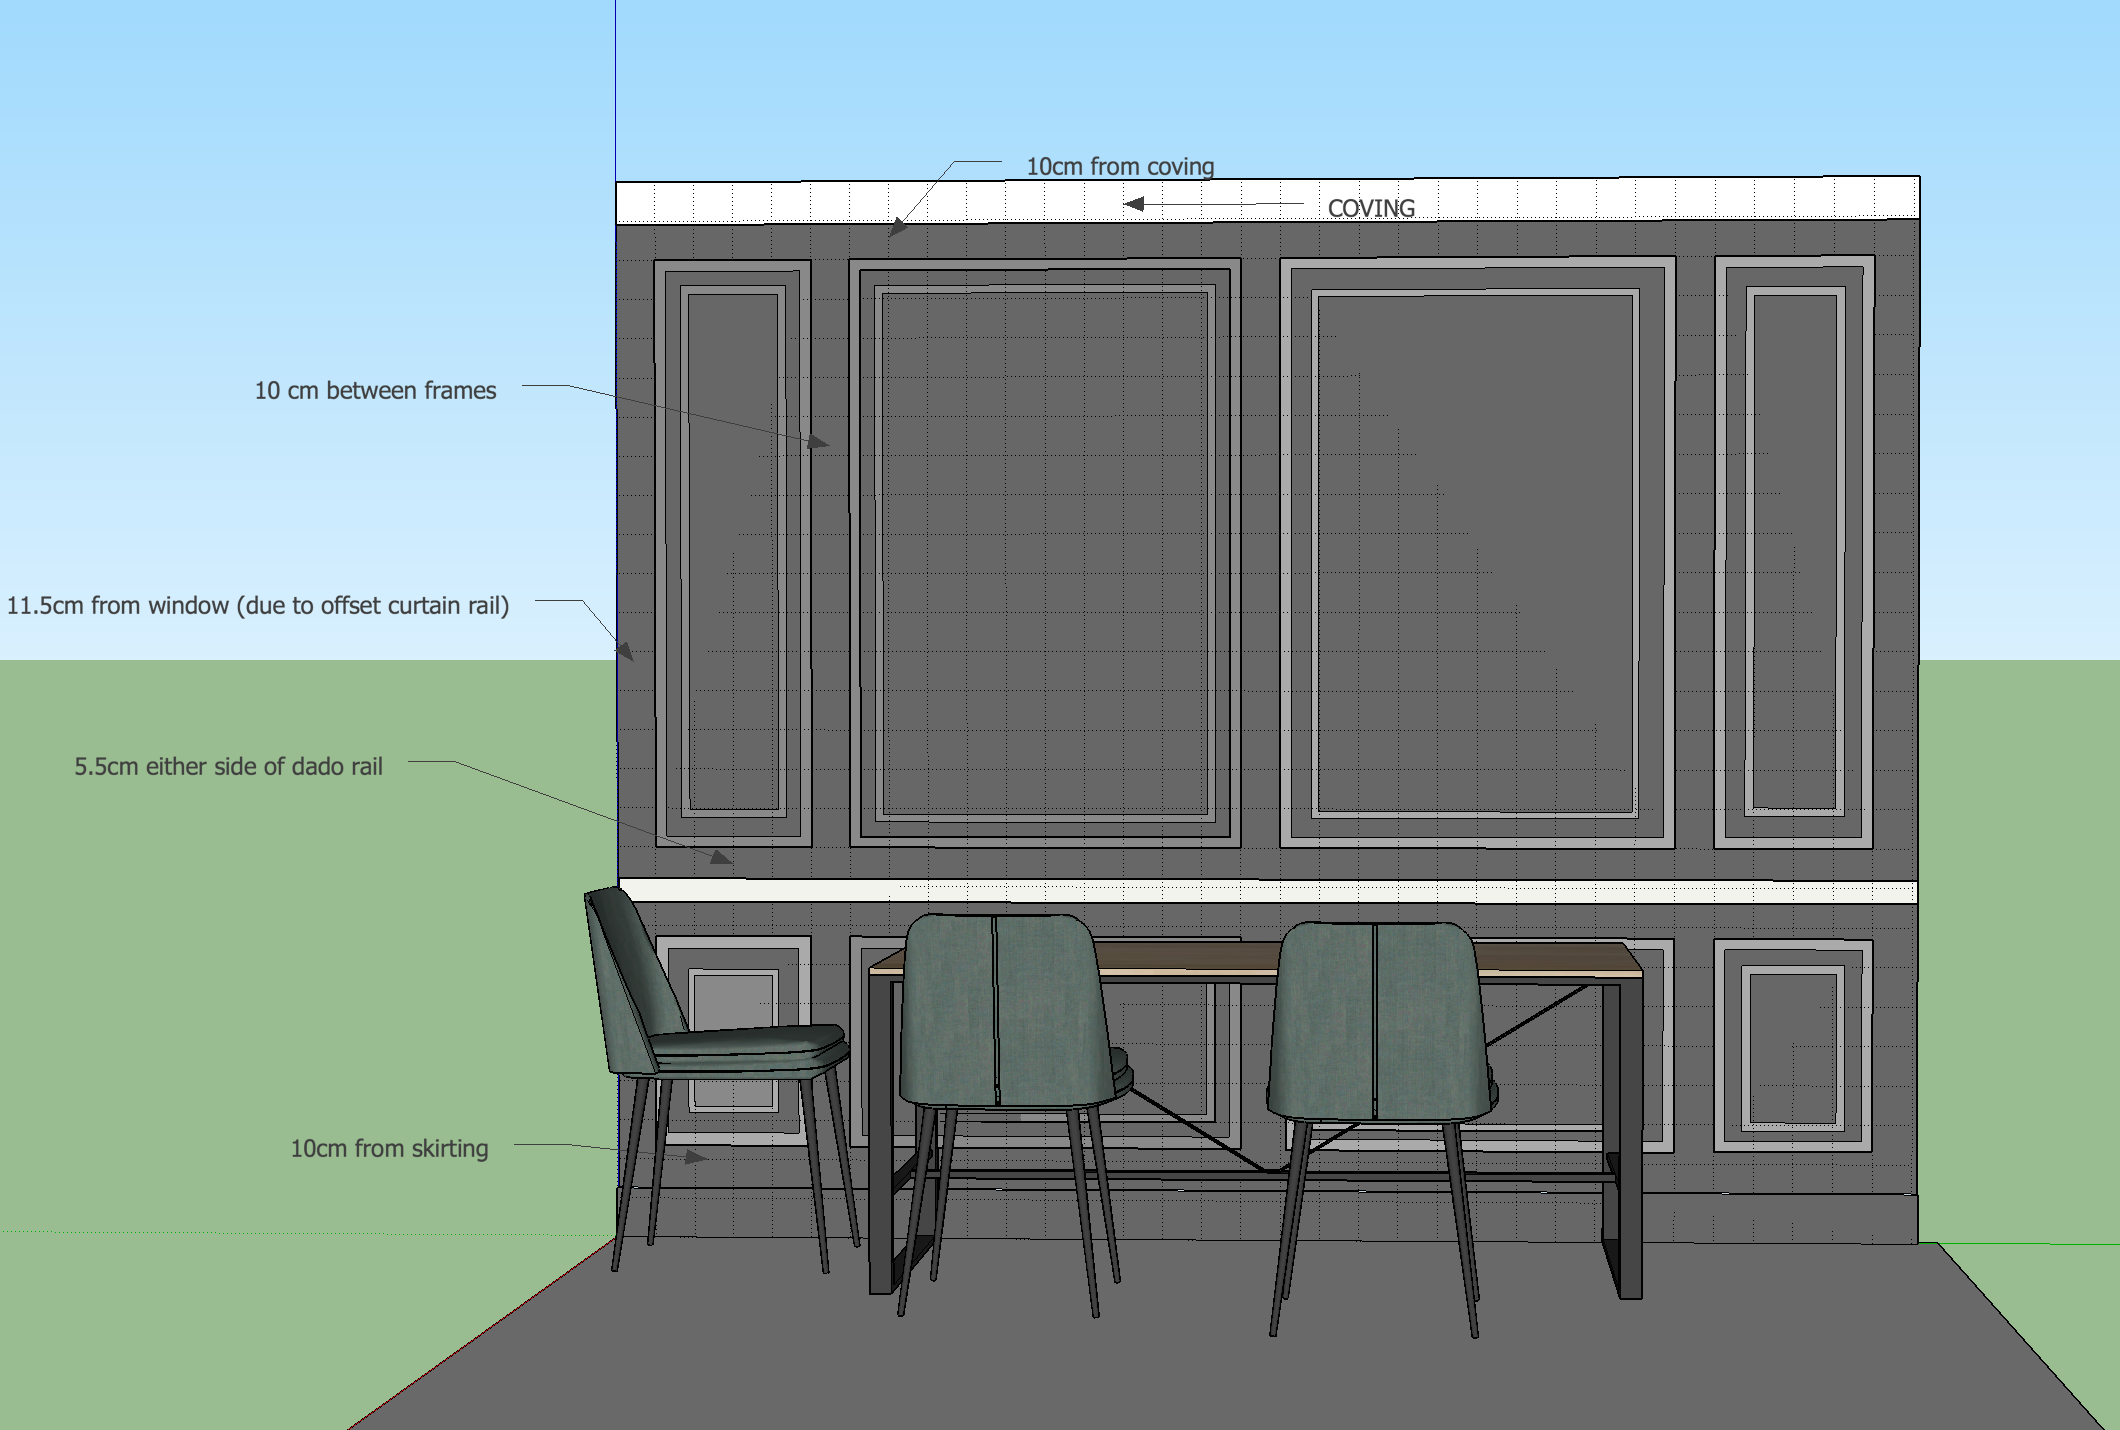
I also kept in mind what type of furniture I wanted to have in front of this wall. Of course, this can change with time but I am fond of panel frames width matching the furniture placed in front… Nonetheless, here, it is not too matchy-matchy with my dining table but it is not too far out and if one would want to put a 3 seater Sofa, it would also work nicely under the two large frames. Details, details, but it is all about the details, isn’t it?
Once I had the “stencil” laid out, I only needed to apply it to the wall so I started literally drawing frames on the wall respecting the distance I had designed. This took a LONG time.
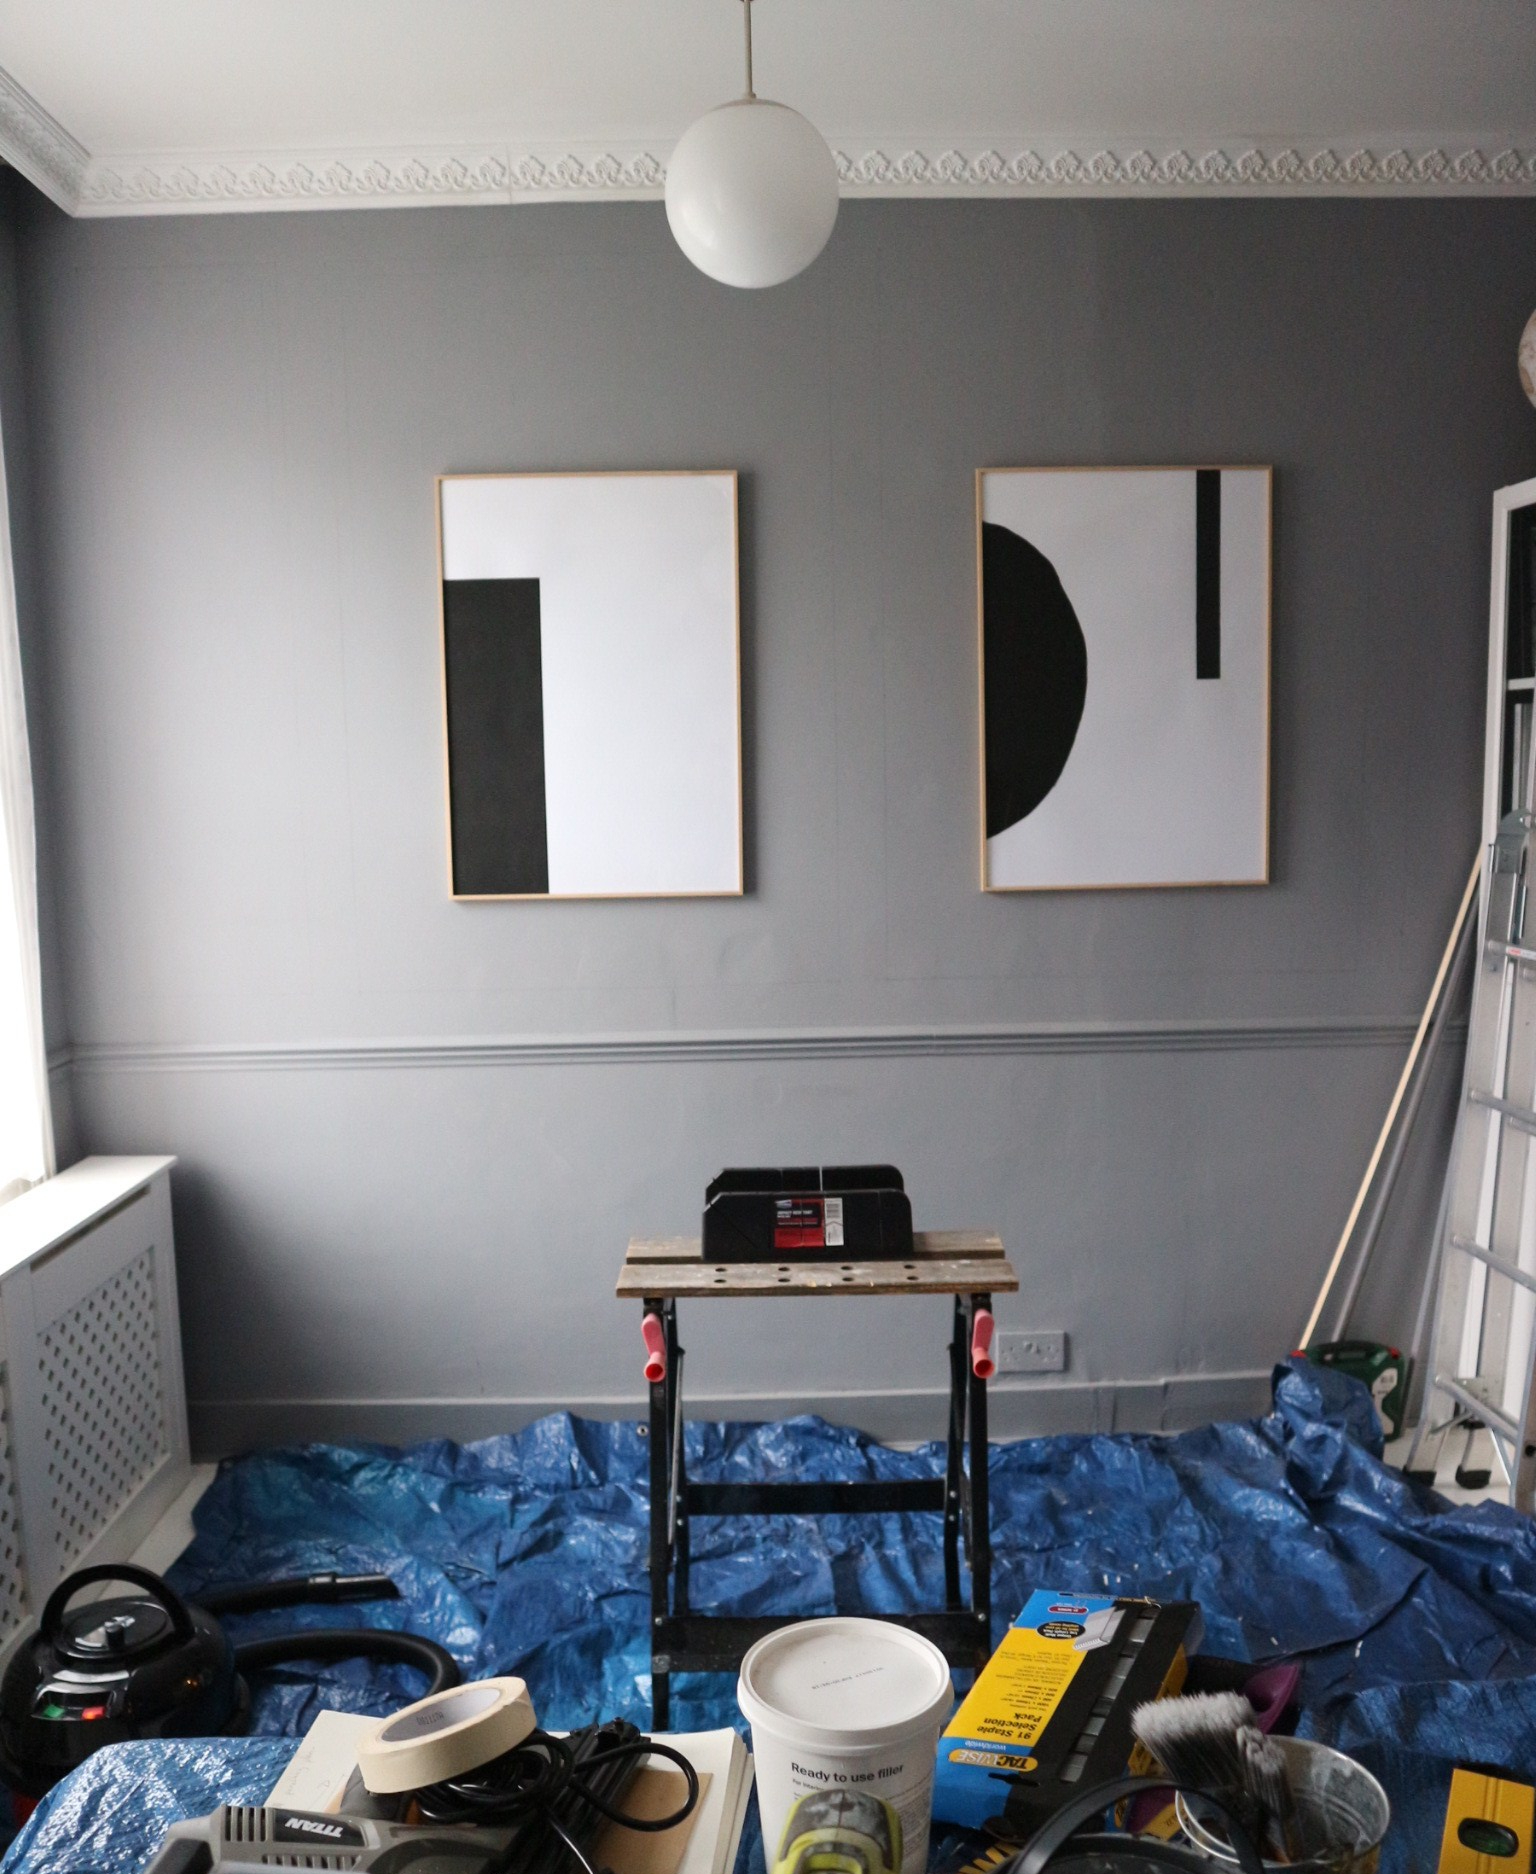

Then I decided to hunt for samples of the architraves to cut them and confirm we like the look of them, I went to a few places but settle on the ones below. That’s it we were ready for a weekend (+3 days) of DIY.
The Material and Tools (including product links)
To draw the wood frames:
- 90cm Spirit Level
- HB pencil
- Tape measure
- Pencil Eraser (couldn’t find mine so had to use the tiny eraser at the end of the pencils, used at least 4, so don’t be like me and get a proper eraser)
To cut and fix the wood frames:
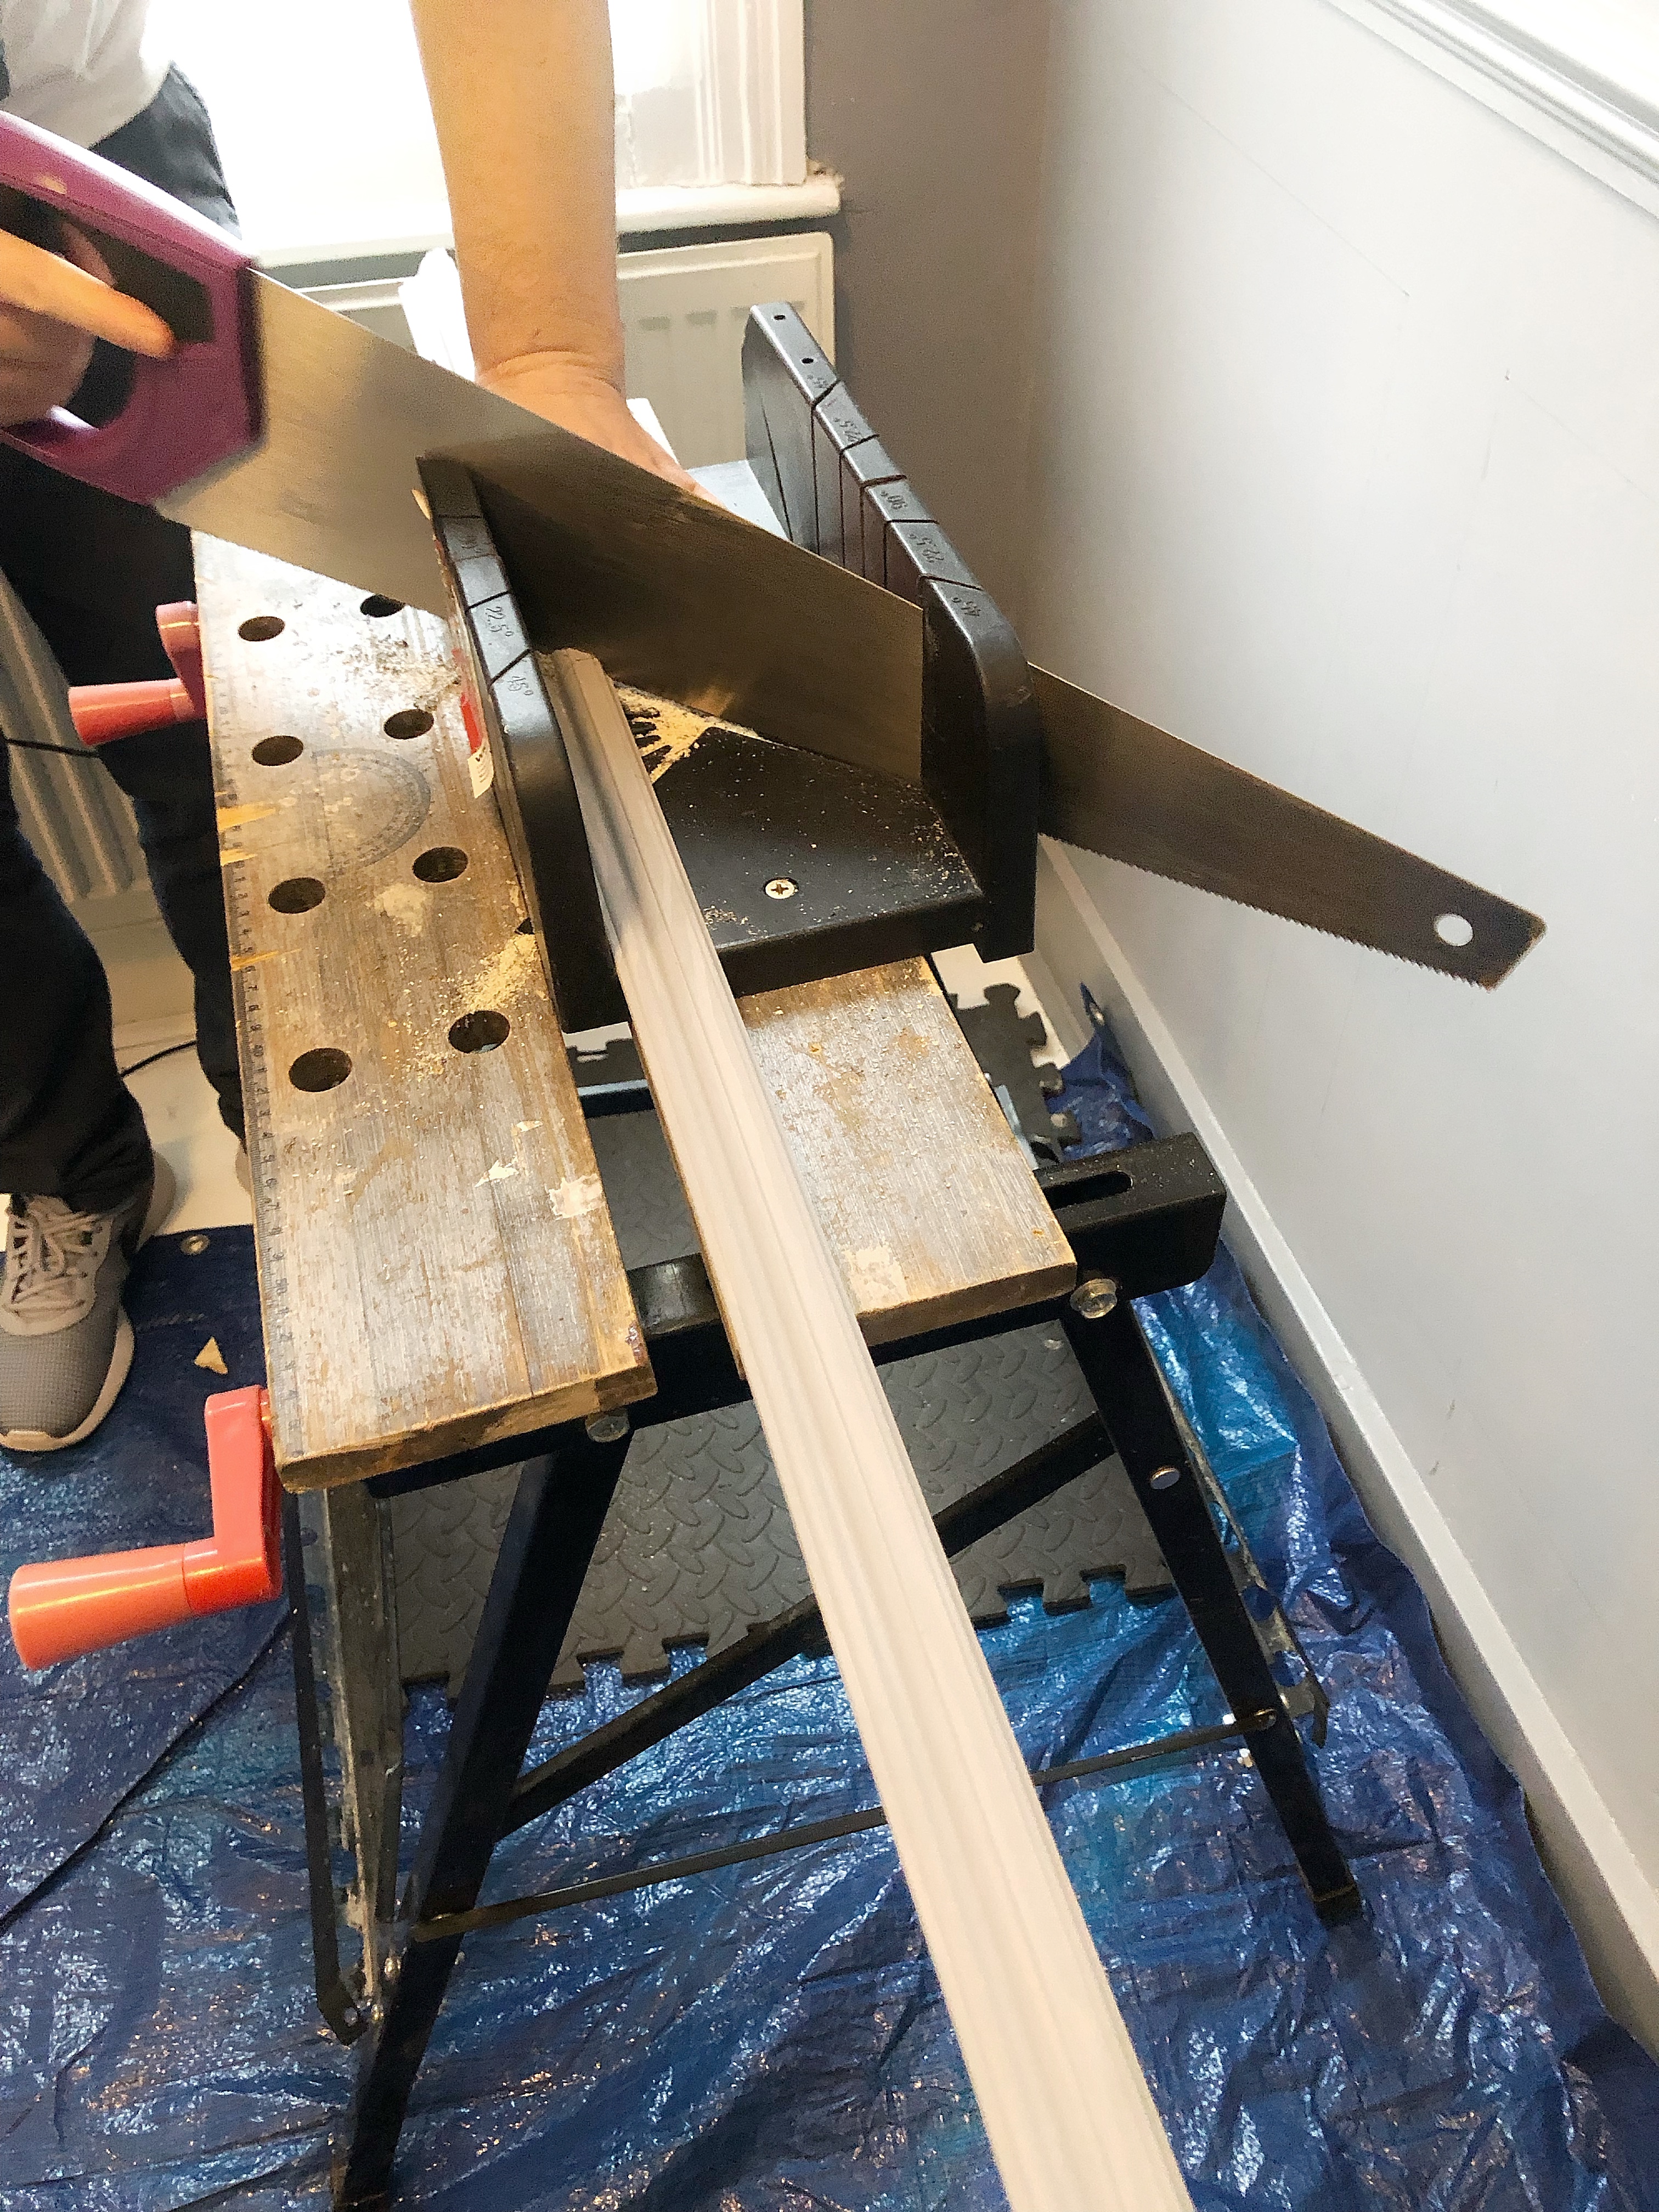
- Fine Saw
- Mitre Box
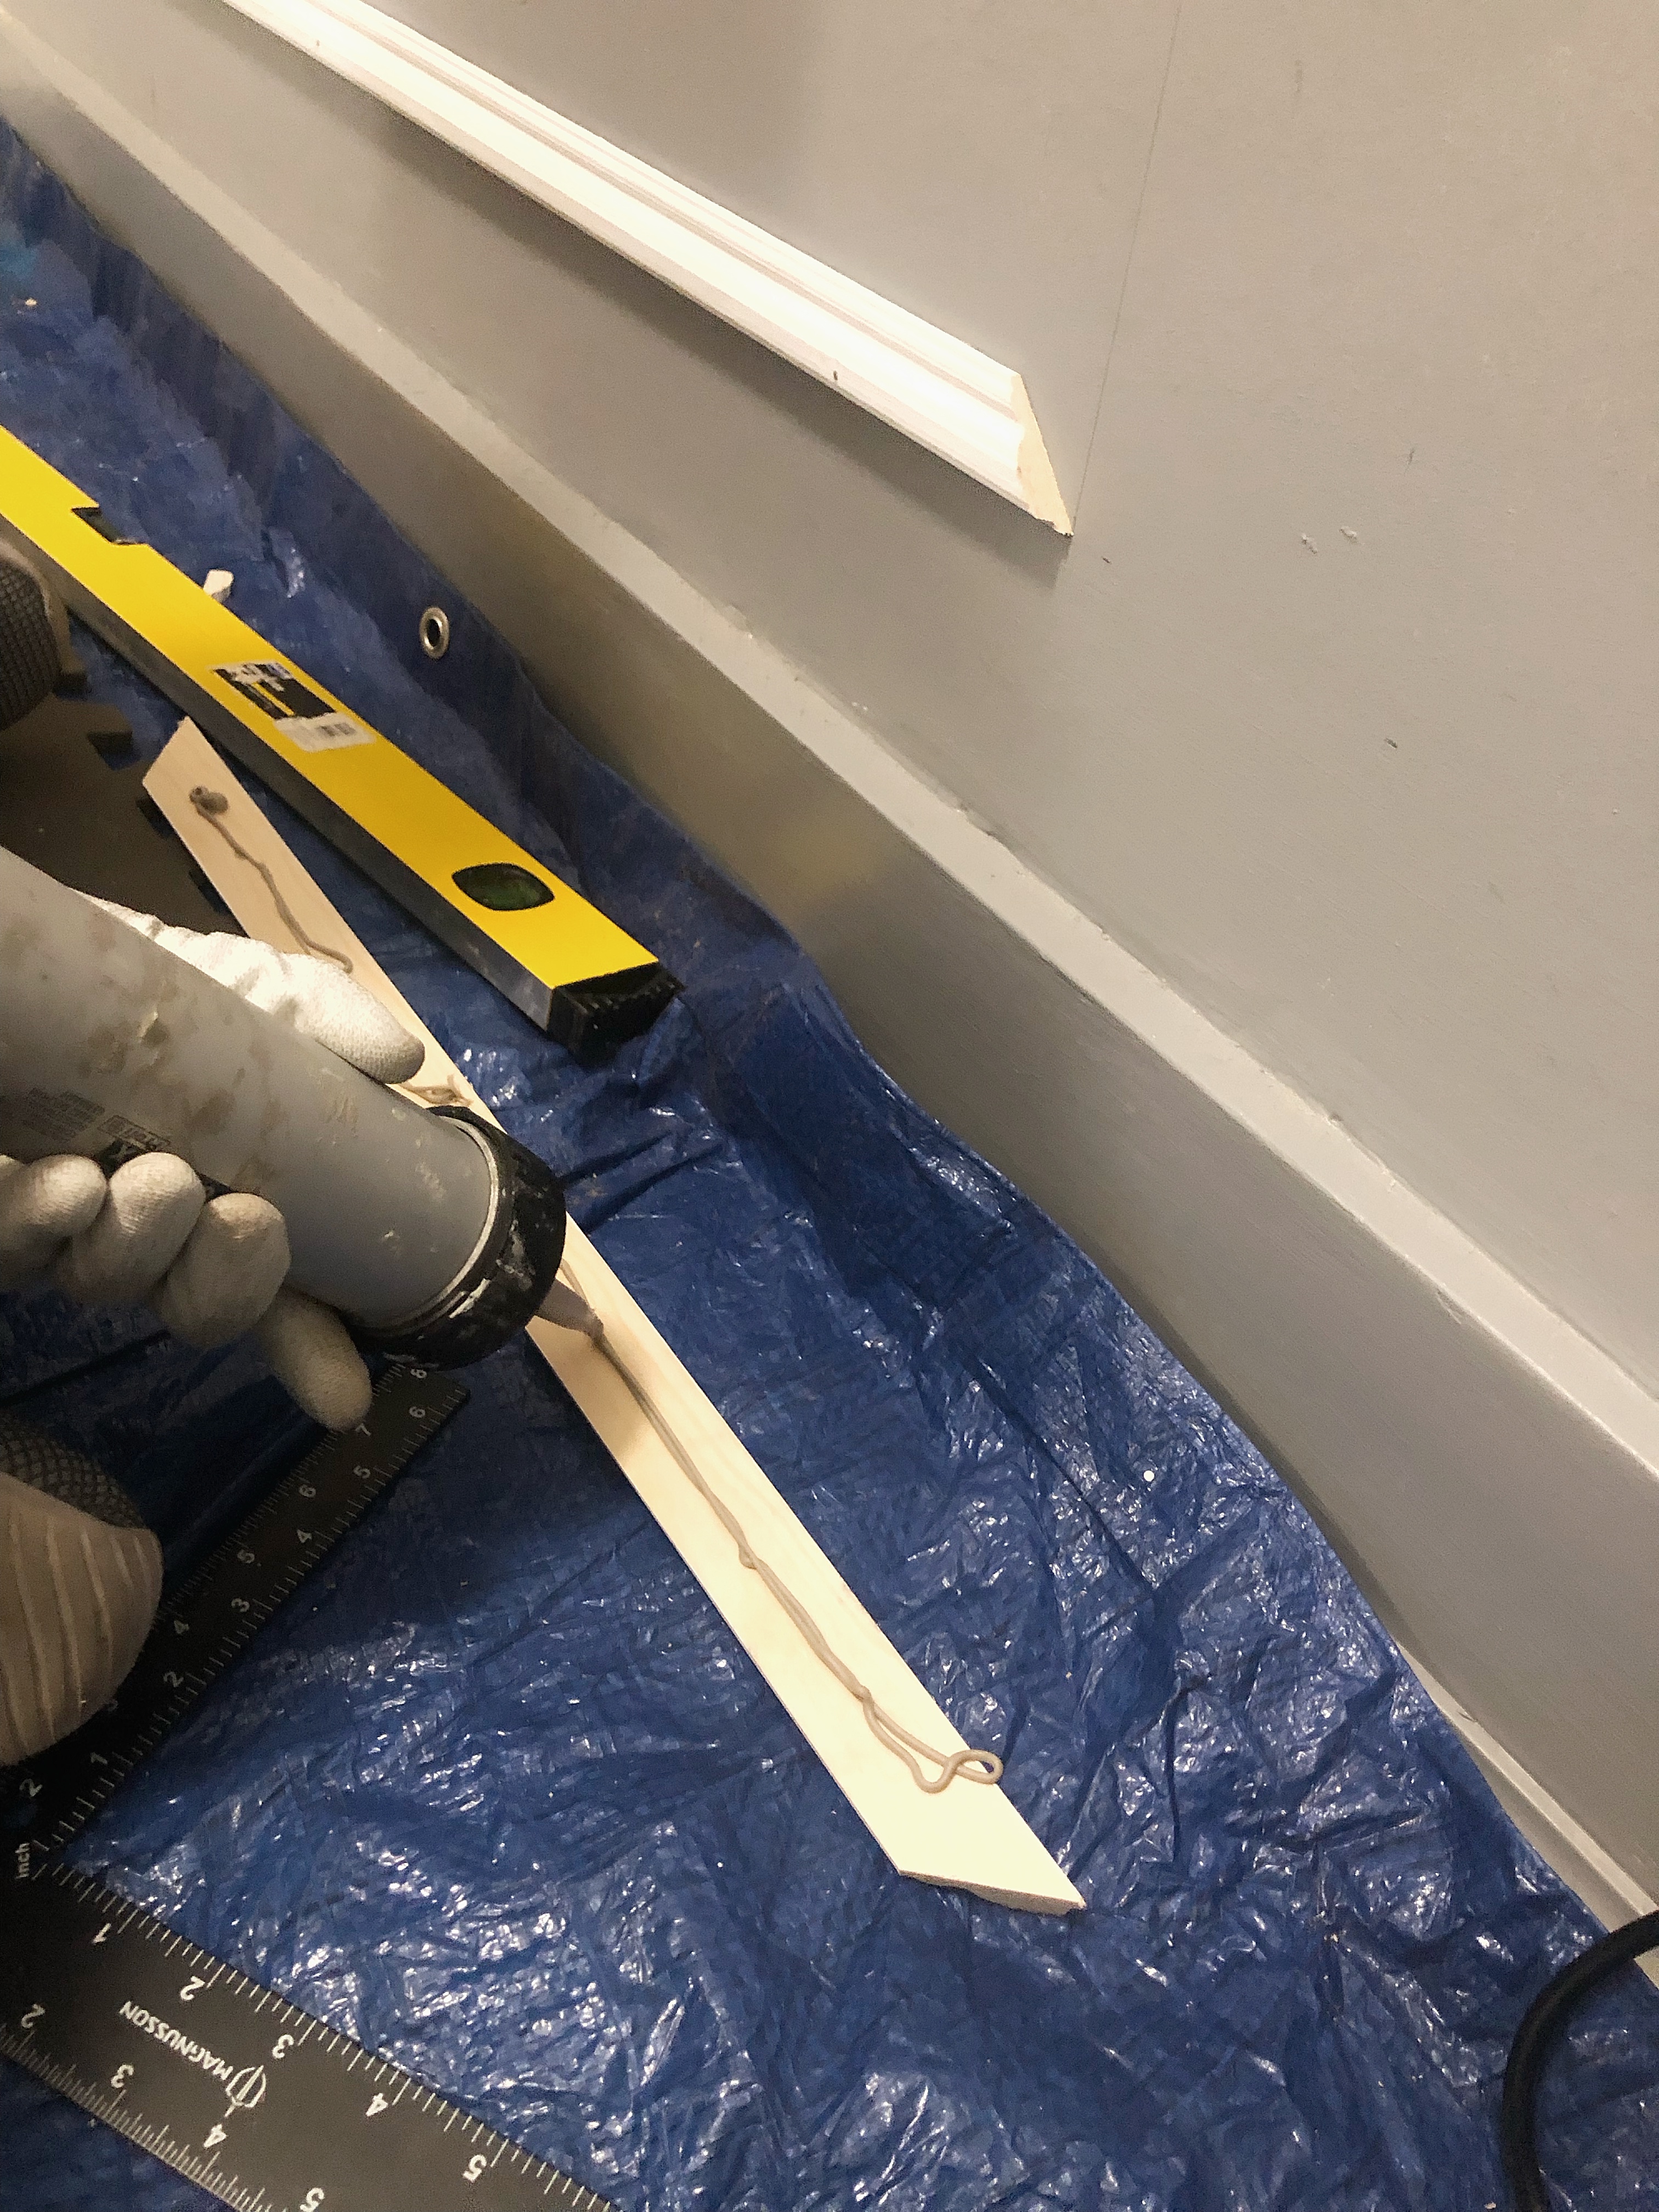
- Glue/Adhesive
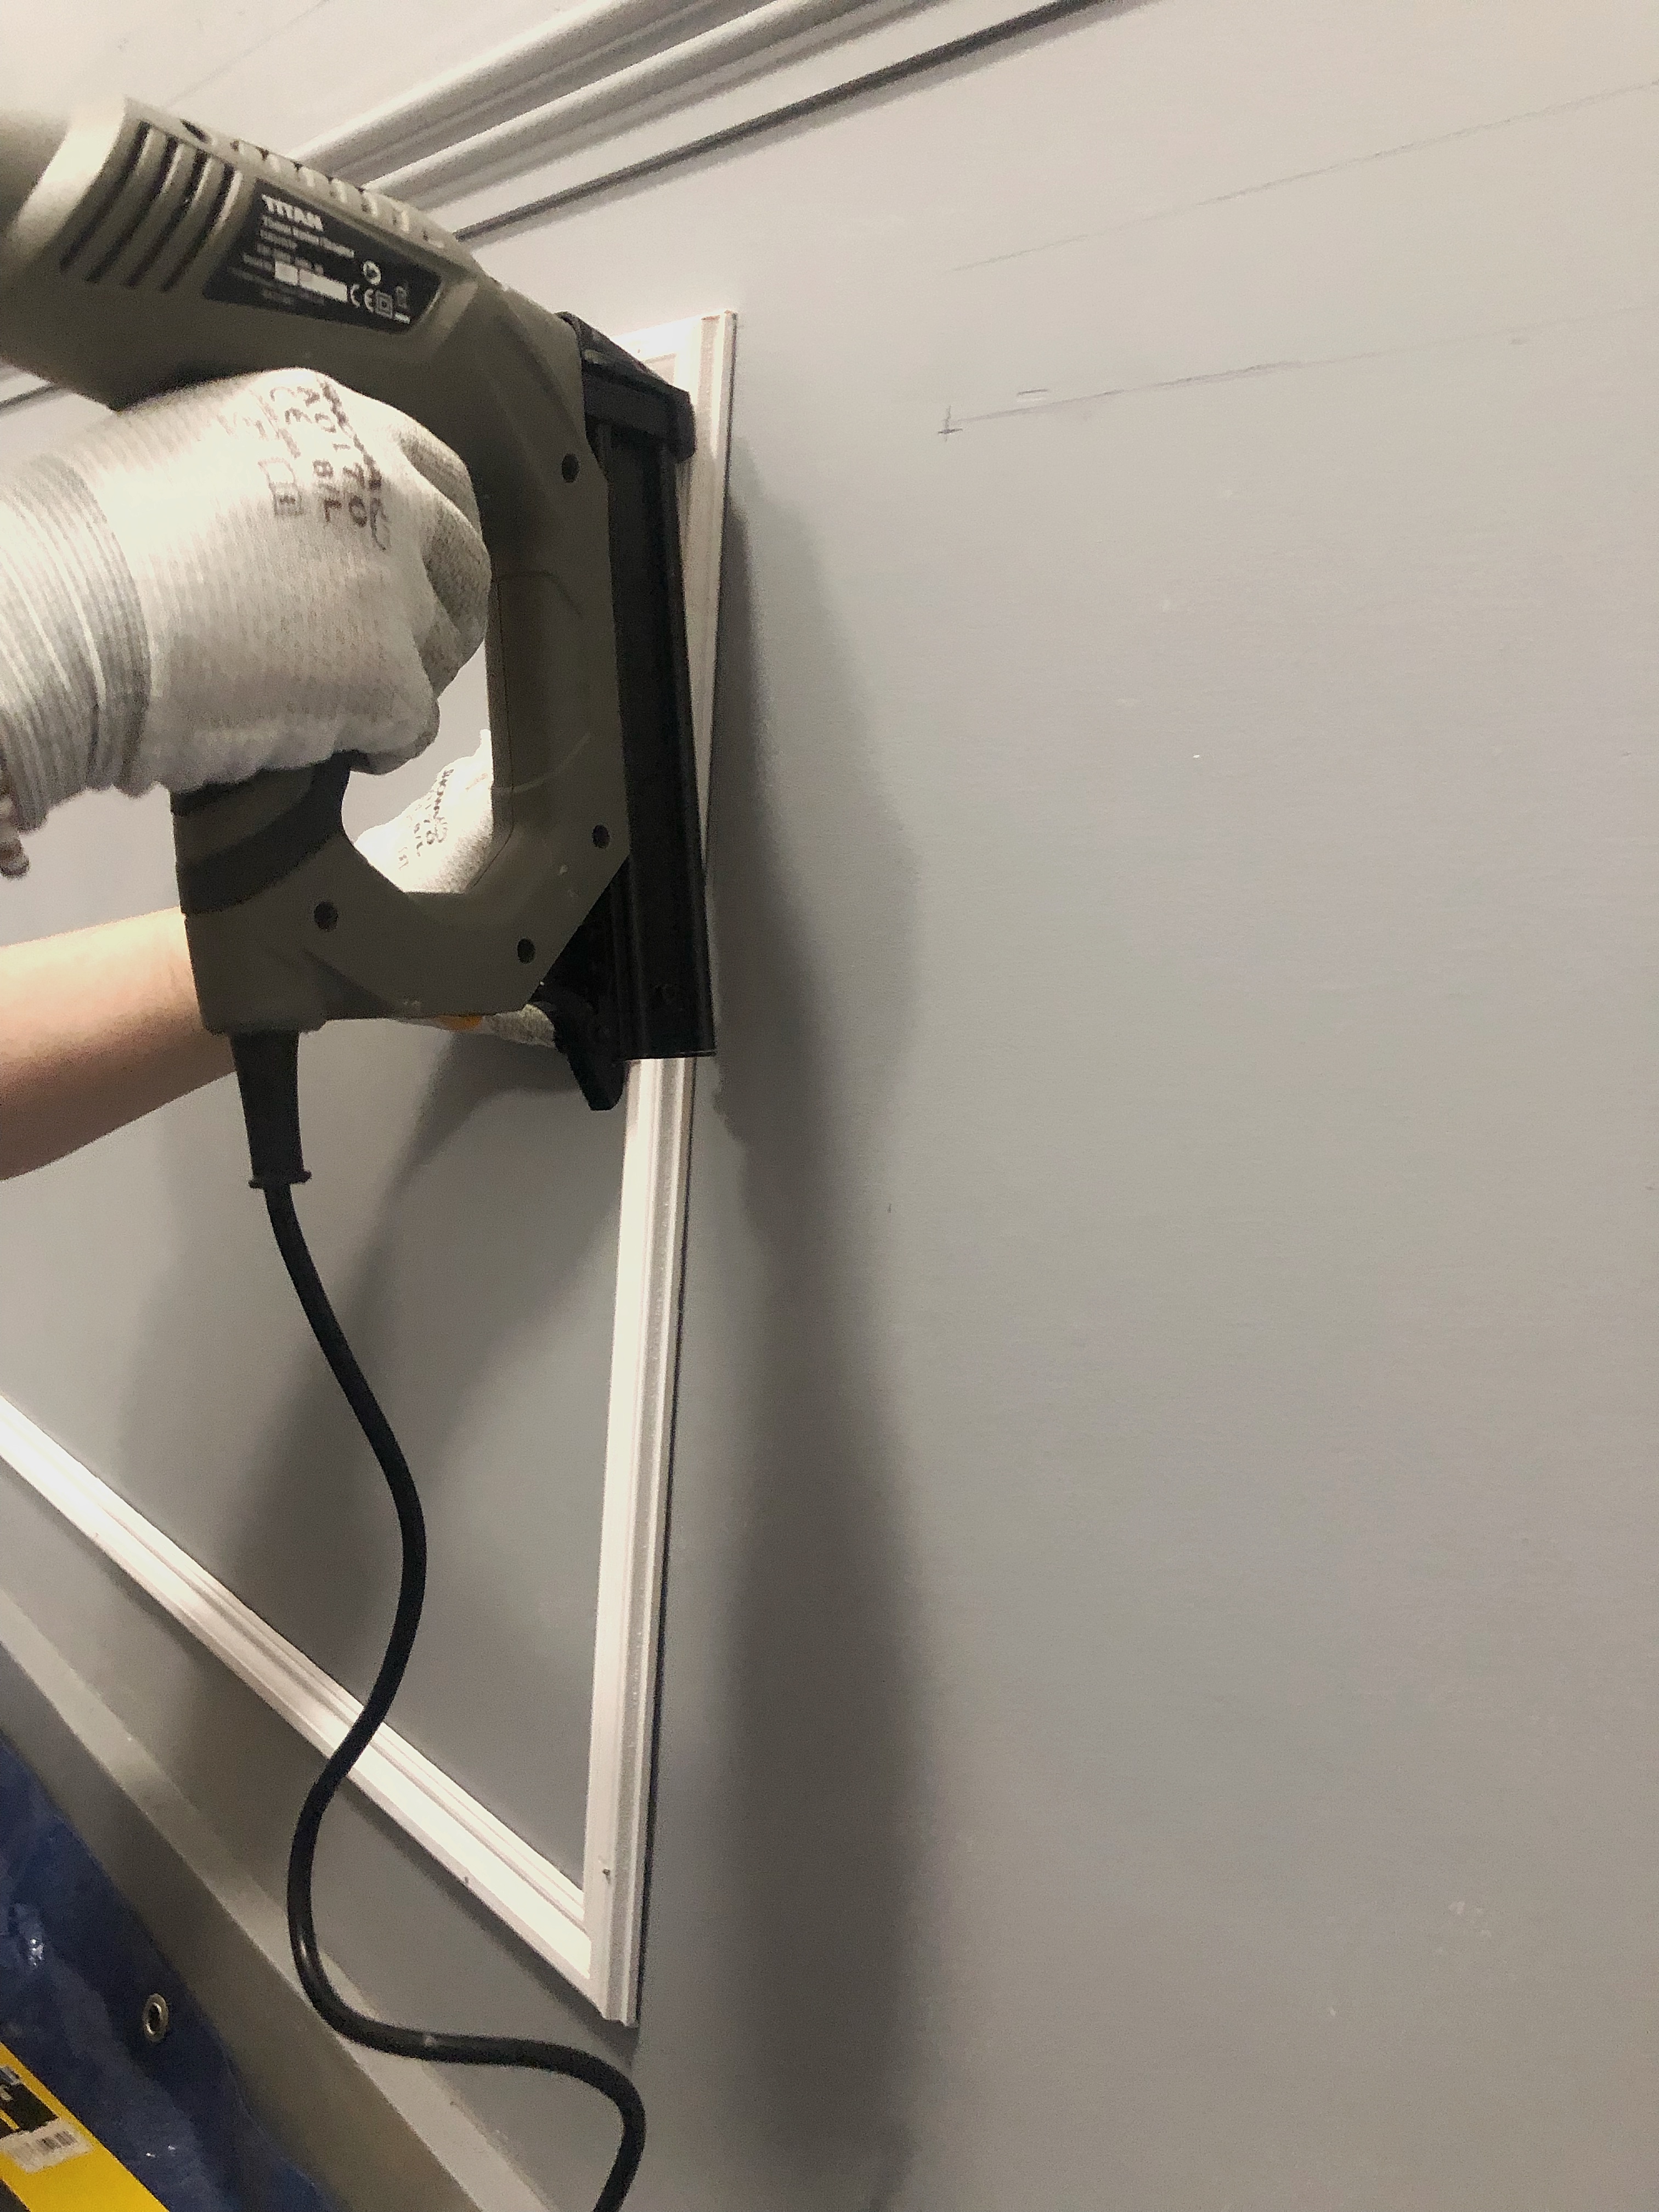
- Nail Gun and nails (make sure the nails are longer than your chosen architrave thickness)
- Wood Filler
- Paint Primer for wood
- 90 degree angle ruler or Set Square
To complete the look
- Wood filler (gun format)
- Fine grid Sanding paper
- Sponge and water bucket
- Paint for the frames – I used the same colour as my wall but had a specific mix made for wood surface and with a satinwood finish (low sheen finish).
Architrave wood:
External frames: 12 pine wood architrave in 32x12x240mm (£8/unit)
Internal frames: 12 pine wood architrave in 22x09x240mm (£3.20/unit)
This wood came untreated and not primed. I had to prime it to protect it and prepare it for paint.
The Installation Process
note 1: About period homes. If your home is anything like ours. You may have an irregular wall surface, so the method I describe below is what we found to be the best for us to manage these irregularities. Luckily the architrave wood is rather thin and can bend to some extent. Additionally, the wood filler comes useful to give a finished, integrated look and to correct any gaps due to wall irregularities.
note 2: we did two frames per panel as this was our personal preference. I will refer it to outer and inner frames. We started with doing all the outer frames first. We actually weren’t sure to go for double frames until we completed the outter frames and then we thought about it if yes or no for a while (it does represent more money and more time, so it is worth considering). But at the end, we did it and yes it was the double of the work and we were tired but we really like the end result so overall worth the extra sweat!
Two people are necessary for this job in my opinion. This is how we divided the work Which seemed to work in regards to our respective abilities.
Me: Design, stencilled out the frames on the wall, primed the wood, add filler, clean filler excess, a little sanding, painted architrave
My partner: Cut the wood, glue and nail the wood to the wall, verified at all times the architraves were levelled and symmetric, add filler (he is better at me at that, but that took some time so we shared the effort). I am grateful for his help in this. I couldn’t have done it without him.
Coming back on the process…
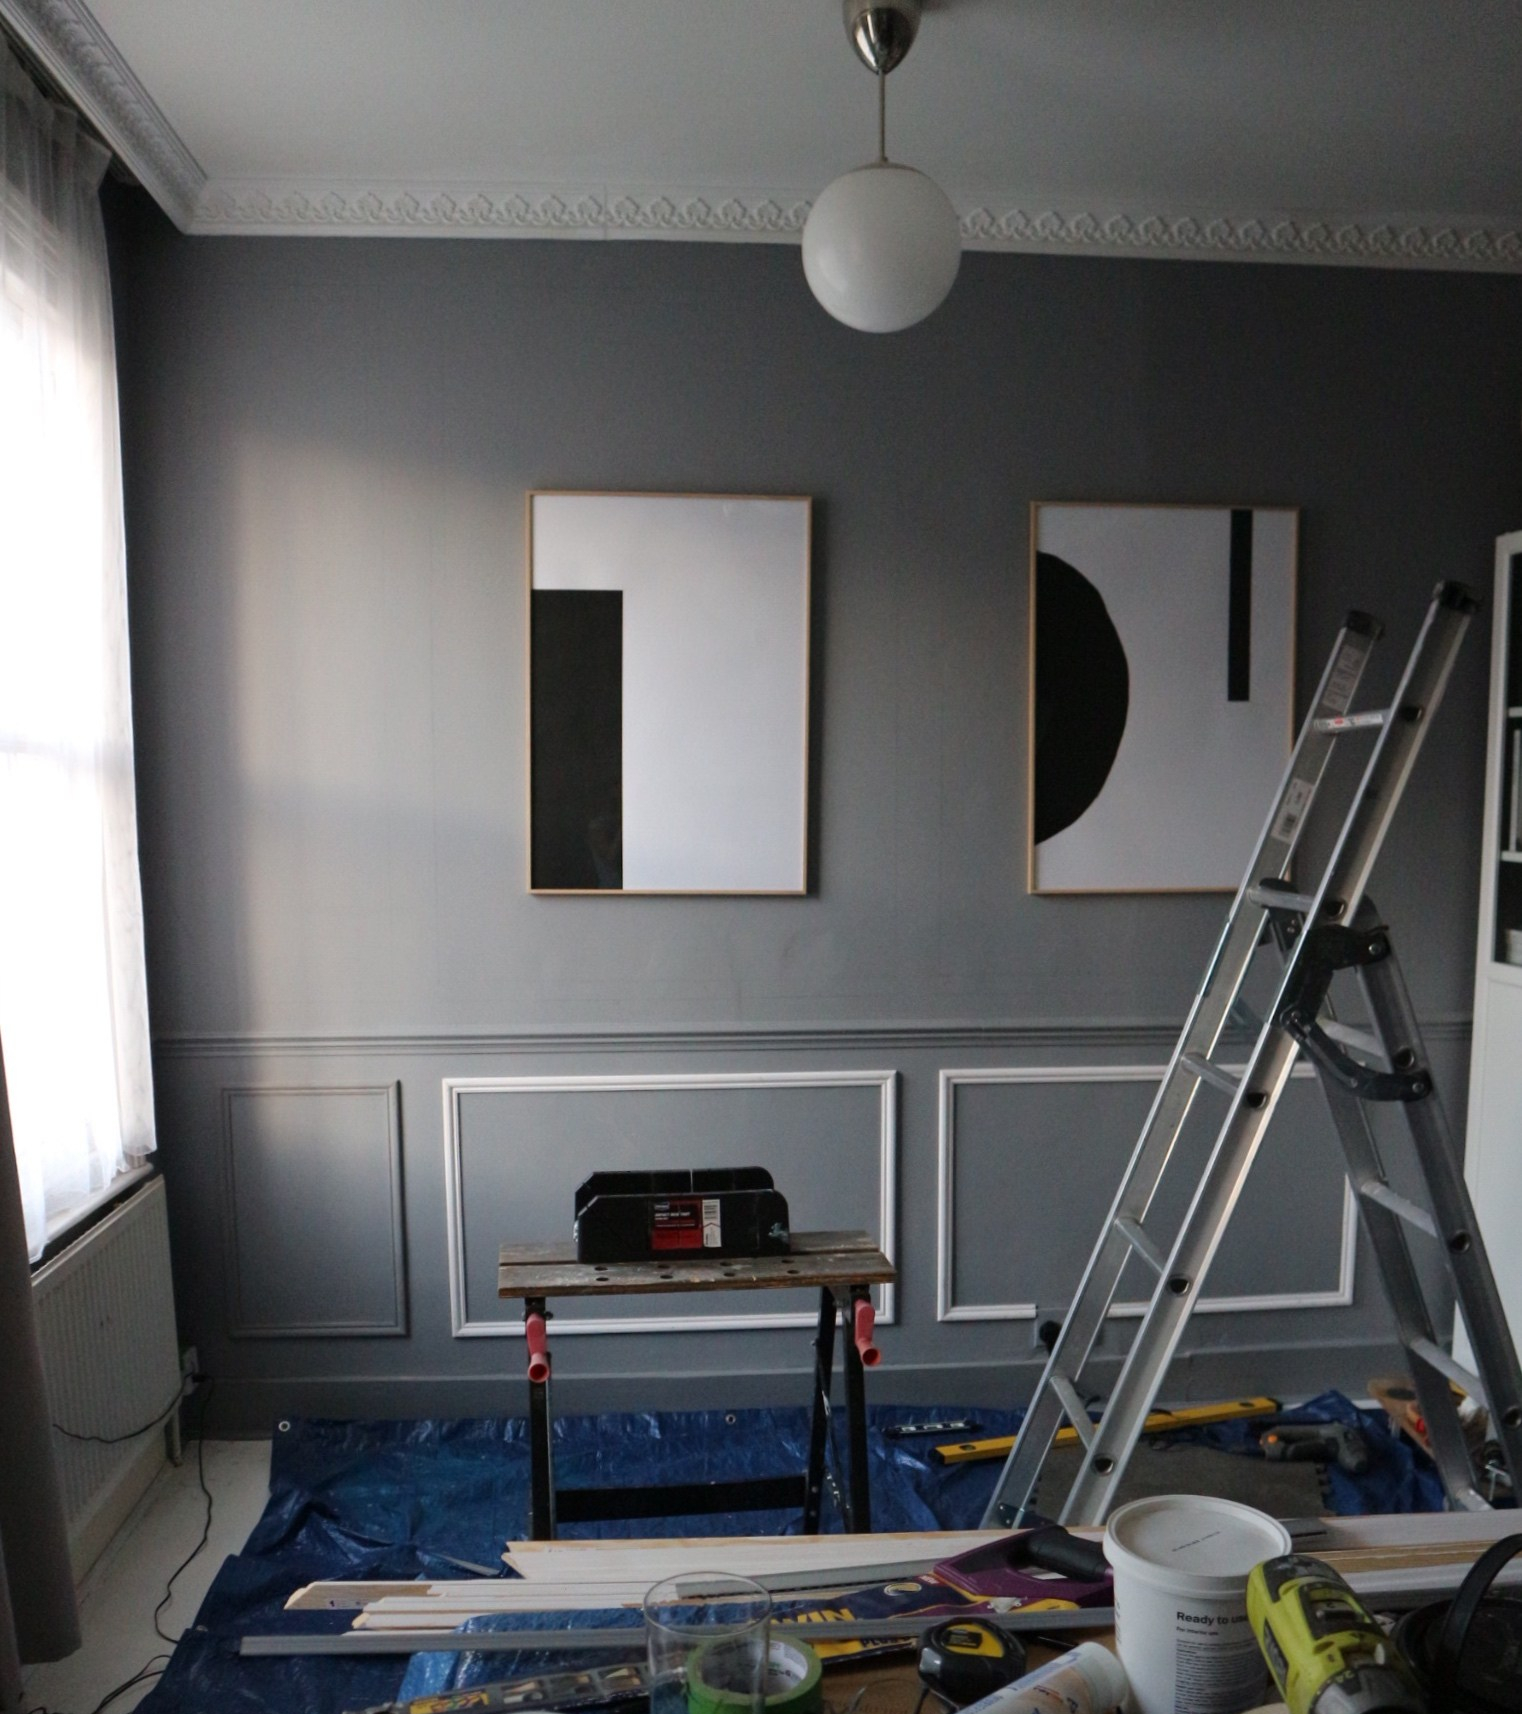
Once the wall is all drawn out, stencil out (use the level). It is OK to just draw the outer frame design first. It is a good opportunity to review you are happy with the proportion of the frames and the spacing between coving, skirting, dado rail (if you have one), you can easily adjust and change. Then lock the design. Measure and cut the wood.
I primed all the wood.
If you wish you can also paint it before fixing it to the wall but you would still need to do touch ups once the frames are up.
Per frame:
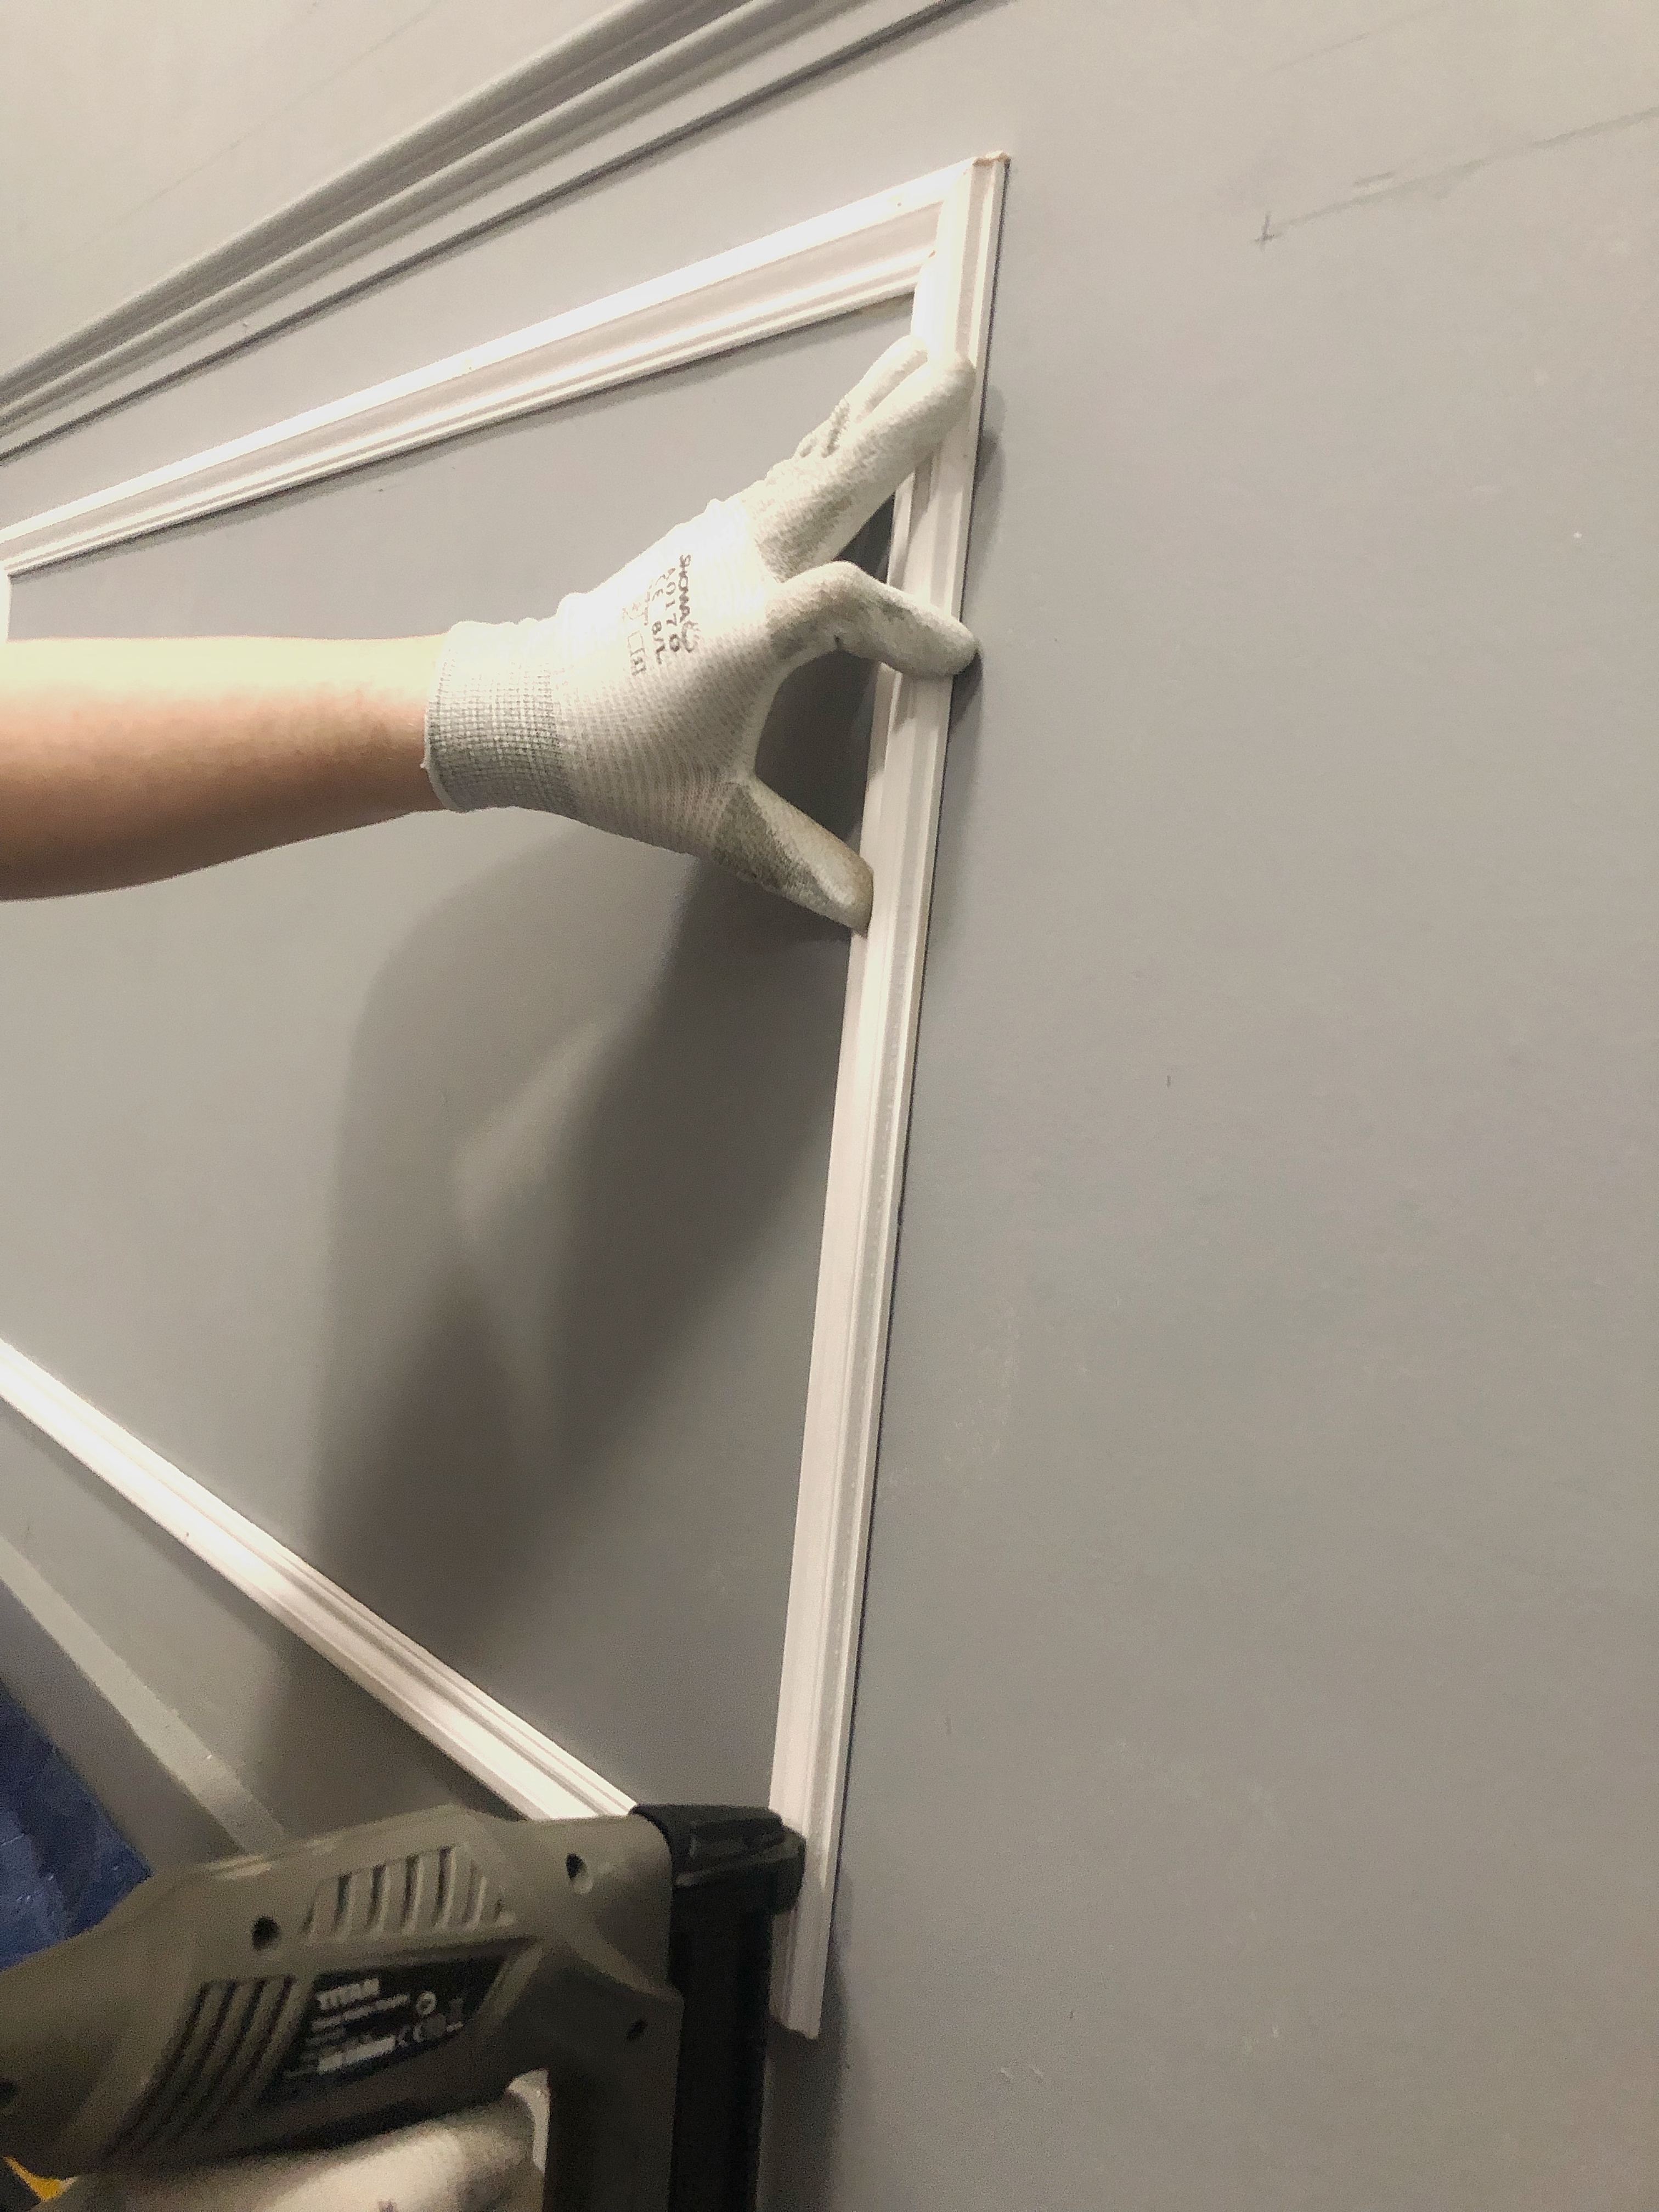
The overall process is to add glue, nail at a 90degree angle and repeat. Add filler in the corners and gaps, sand and paint.
Start ideally with the top architrave (add glue, use nail gun, and spirit level) – this will set the level of the frame.
Then add a side piece, using a 90-degree angle ruler, add glue and nail the top of the side piece, leaving the bottom of the side piece loose. Repeat with the other side piece. Then finally, add the bottom piece (glue) and wiggle it with the side pieces for a perfect 90-degree angle. (This is how we did, to cater for the variability of imperfect/not straight walls). Once you are happy, use the nail gun to secure both bottom side piece and bottom panel piece.
Repeat for all outer frames.
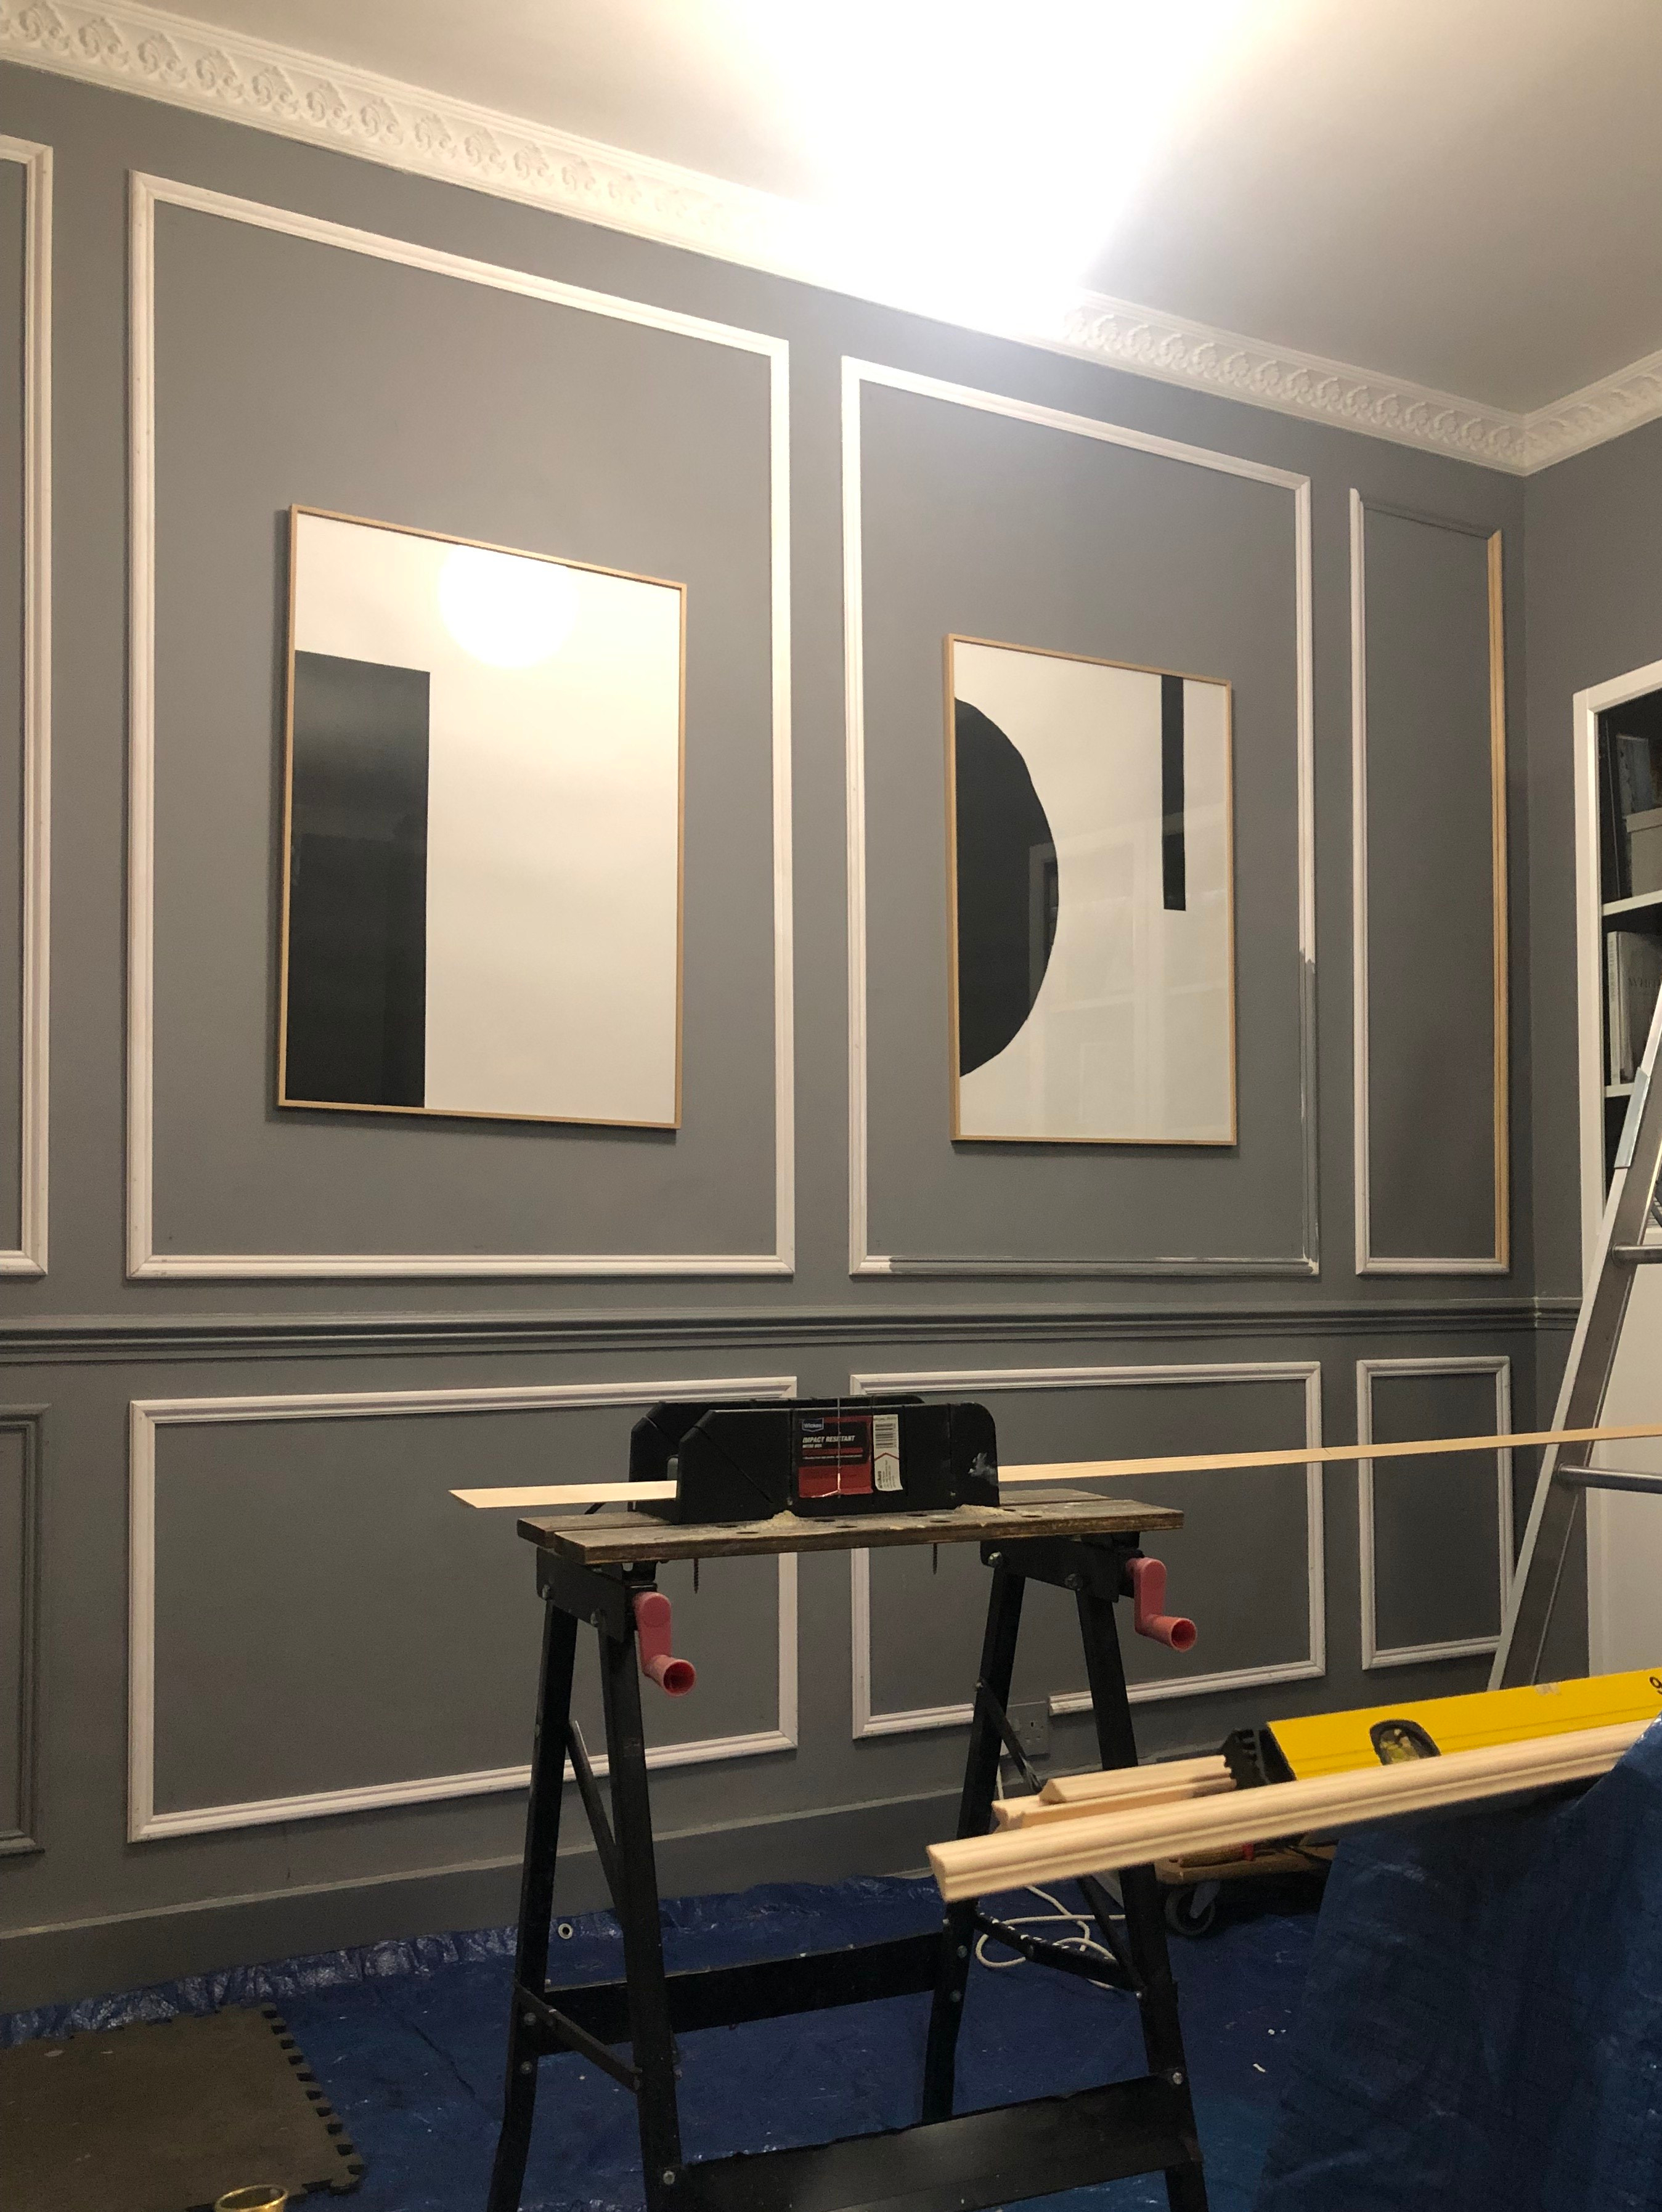
At this stage, we could have called it quits and finished the project. But I decided to go for double frames so we did all the above once again with thinner architraves (crazy I know).
We secured a gap of 28mm between the outer and inner frame. We kept this gap throughout to fix the inner frames. Keep an eye on the horizontal and vertical line at all time which shouldn’t be a problem if it was stencilled out well and spirit level used.
Add filler with the gun, clean any excess with a wet sponge straight away.
Leave it to dry and it is ready for painting.
Youtube Video link: https://youtu.be/XtvwMP6Apts


15 responses to “How to Create Architectural Wall Panels/Moldings – A step-by-step DIY Tutorial”
This looks amazing! I did something similar in our downstairs loo (so a much smaller project!) and have been wondering about whether to attempt it in the spare bedroom too – you’re really tempting me to go for it!
LikeLike
Definetly do it! It is a pain to do but they are so nice to look at everyday! I’m curious about your loo now (never thought I’d ever say that to someone ☺️)
LikeLike
Well done Marlene. This looks amazing – what a transformation. Gives the room so much character. I would really love to have a go at this. Fabulous high ceilings and plaster cornice – such a beautiful room now!
LikeLike
This is lovely! We are in a similar boat, trying to add features back into a period house. We did a DIY hex wall and found it far easier than we thought. We will be doing a similar panelling to yours as our next DIY, and it looks gorgeous in that grey!
LikeLike
This makeover has worked so well the transformation is really amazing. The panelling really does add a lot of character to the room and I love the choice of colour too.
LikeLike
I can definitely see the Parisian look! It looks very sophisticated now. You should be very proud of the result! I must say I’m not the best at DIY 🙈
LikeLike
Such a great tutorial and it looks amazing!! X
LikeLike
What a striking transformation and love the styling too x
LikeLike
This is an absolutely blinding step by step on how to do this. I’ve drawn up several plans for wall treatments like this but never actually done it myself in my own home. I’m quite tempted to do it in my hallway….. but it leads up the stairs which is a bit of a headache. Your’s looks abasolutely stunning. So maybe I should rethink it.
LikeLike
I so want my dream period house so I can go ahead and do this now. Such a great diy post thanks for sharing!
LikeLike
That looks so effective it made the world of difference and looked like it should have always been there
LikeLike
What a transformation. It looks amazing. So glad you went for the double frame, definitely worth it.
LikeLike
[…] I’ve wanted to add wood panelings from day one. Seeing that this place had a nice ceiling hight of 2m70, I thought they would look so great there. This will be the first project of the year! Update: We have done one wall in mid-January and slowly thinking about doing other walls. Here is the blog article about it: How to Create Architectural Wall Panels. A step-by-step DIY Tutorial […]
LikeLike
[…] may have detected our love for period features if not feel free to have a look at this blog post: How to Create Architectural Wall Panels/Moldings – A step-by-step DIY Tutorial. In this room, there was already a small cornice so we wanted to add a pretty ceiling rose that […]
LikeLike
[…] Like my wall panels? Then you’ll like this other blog article: How to create Architectural wall panels – DIY Tutorial […]
LikeLike